Adobe Creative Cloud
The tips provided below describe one of many ways to manage editing. Everyone has their own way of working so feel free to incorporate some or all these steps to help speed up your workflow.
It is, of course, possible to open one image at a time, edit and save your image. Here we are going to focus on batch editing and automation to edit, rename and export multiple images simultaneously.
Before we begin, open your preferred storage location, and create a folder which clearly identifies the project you are working on. Within that folder create a folder called RAW. Copy the images from your memory card or camera to your newly created RAW folder.
Once the files have copied over you may open Adobe Bridge.
Step 1: Selection
Once Adobe Bridge is open, navigate to your RAW folder and copy and paste the file path into Bridge. The file path field is located under the Essentials tab at the top of the window. Alternatively, you can navigate by double-clicking the relevant folders.
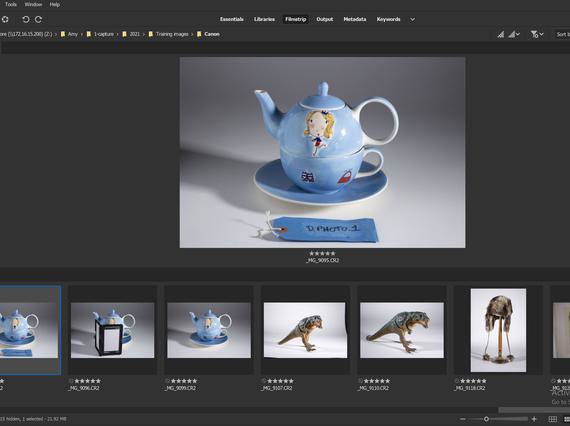
Switch your Adobe Bridge set up to Filmstrip mode, located on the top, middle panel. Its large display area makes reviewing each image easier while also allowing you to see your thumbnails.
The first thing is to select the images you want to work with. This is important as you don’t want to waste time editing images that you are not going to use. As a rule, it is best to avoid deleting images. Instead, filter what is visible so that you can see only the images that you want to work with. This gives you the flexibility to go back and change your selection at any time by simply changing your filter preferences.
There are multiple ways to tag the images you want to work with; for this demonstration we are going to give them a rating. Rate the images you want to keep with 5 stars by clicking the thumbnail. Beneath the thumbnail you will see 5 blank stars, click on the last star to highlight them. This indicates the rating has been applied. Alternatively use keyboard shortcut Ctrl + 5. If you have a set of images together that you want to keep, you can rate them as a batch. Select the first image, hold down Shift and select the last image and then apply your rating. To remove the rating, click the circular symbol next to the stars or use keyboard shortcut Ctrl + 0. Go through all the images applying this rating to the ones you want to keep. Include the image of your grey card and any images containing file names or blank separator images – these will help you keep track of your images as you work and can be removed later.
Once you have made your selection, in the left-hand panel there is a tab named Filter, click the arrow next to the word Rating to expand the list. Check the box next to the 5 stars. Now the only images you can see are the images you have selected. To bring the hidden images back, check the No Rating box.
Now that you have made your selection, you can open the images in Camera Raw.
You can, of course, edit each image individually in Photoshop, however, Camera Raw allows you to make changes to multiple files at the same time, speeding up your workflow. It is best to work in batches of 20-30 to avoid overloading your computer.
Select your images. If working with Raw files simply press Enter. If working with jpegs, select the open in camera raw button which looks like a camera shutter, beneath the Tools tab at the top left-hand side.
Step 2: Batch editing
Colour balance
Colour balance is important as the colours in your image should represent the real object as accurately as possible.
You can use the image of your grey card to do this. Start by selecting the image containing the grey card or colour checker. With this as your starting image, select all remaining images by right clicking > Select all or with keyboard shortcut Ctrl + A.
Select the White Balance tool. This is the tool which looks like an eye dropper. On older versions of Camera Raw this tool appears in the tool bar above the preview image; on newer versions it appears in the panel on the right-hand side. With the eye dropper, click on the grey square of the grey card. This is telling the software that this area is neutral grey and to adjust the colour accordingly. This change will apply simulations to all selected images.
Exposure/ Blacks
Next, we are going to look at exposure. Sometimes, especially if using automatic settings, the image may come out over- or under-exposed. To correct your exposure, we are going to use the exposure slider on the right-hand side. You can move the slider right to brighten the image and left to darken the image. You can speed up the process by adjusting the exposure of multiple images at the same time. When batch adjusting exposure, remember that the same adjustment will be applied to all images, so make sure the images you select are of a similar exposure. If the images are positioned together, click the first image, hold Shift, and click the last image or, alternatively, if the images are spaced out, hold Ctrl, and click the images you want to use. With your selection made, adjust the exposure with the exposure slider.
The black slider will add a little depth into the image but should be used sparingly. For more accuracy, click the box above the slider and adjust with the up and down arrow key. This will move the slider one increment at a time, giving you more control. Moving the slider left will add more black tones. This can also be applied to multiple images at once.
Crop
Finally, you are going to crop your images using the crop tool. If you are using an older version, this is located on the tool bar above the preview images. In newer versions it is on the tool bar on the right-hand side.
You can adjust your crop area with the buttons in the corners and all four sides. Click and drag the edges of the square to adjust its size. Click in the centre of the crop area to move the square around. To rotate your crop area, move your mouse cursor outside the grid until you see a curved arrow. Click and drag to rotate your crop.
As with the other tools, the crop tool can be used on multiple images simultaneously. Select images where the object is in the same position within your frame and apply your crop.
Once you are happy with your adjustments, click Done.
Step 3: Batch renaming
Now your edited images are visible in Bridge it is time to rename your images. It is good practice to name your images after the accession number of the object so they can easily be traced back to the object if they are misfiled. It also makes searching for images of specific objects much easier.
There are a few ways you can rename your images. If you have only one or two images of an object it may be quickest to click on the image and click once on the filename. This will make the field editable. Ensure when renaming your file that you do not change the extension, eg, .CR2
To batch rename, select all images relating to one object, ignoring any grey card or blank separating images. Select Tools > Batch Rename or Right click > Rename. Keyboard shortcut CTRL + SHIFT + R.
In the pop-up window, select Rename in the same folder.
You can add or remove fields with the plus and minus button.
The first time you use this you will have to set up your preferences. Create three rows using the + and – buttons.
- Set the first row to Text
- Set the second row to Sequence Number
- Set the third row to New Extension
In the field next to the top row type in your accession number followed by an underscore eg, D.PHOTO.1_
In the second-row type 1 in the second field. Set the 3rd field to Four digits.
In the 3rd row, copy exactly the extension as it appears in your original filename. It appears at the bottom of the window under Preview > Current Filename. In this case it is .CR2. It is important that you do not change the file extension.
Our preview name now reads D.PHOTO.1_0001.CR2
Click the Rename button. This will apply your file name to all your selected files. These settings will remain the same when you next use the batch rename function. All you will have to do from then on is change the accession number. Allow sequence numbers to run on as this will reduce the likelihood of the same file name appearing in future if this object is re-photographed.
Now that all your files have been renamed, you can remove your grey card, label, or blank images. To do this we are going to remove the star rating. Select the images you want to remove and click the circular symbol next to the stars or keyboard shortcut Ctrl + 0.
You should now see only your edited, renamed files. Create a new folder named Selection and move all your finished files into that folder. If you were working with jpegs, the process is now complete.
If you are working with Raw files, we need to convert the files into a usable format. TIFF is recommended as it does not compress the file. Jpegs can be made, if needed, at a later date. By using TIFF, you are retaining maximum quality.
Step 4: Batch save as TIFF
To batch export our images as TIFF we are going to set up a script. This lets Photoshop automate the process of opening the files and saving them in your desired format. To do this, open Photoshop. There is no need to open any files. Click File > Scripts > Image processor.
This will open a pop-up window.
In Section 1
Check the Select folder box and navigate to the Selection folder.
Section 2
Check the Select folder box and navigate to same folder.
Section 3
Uncheck Save as JPEG and select Save as TIFF.
Section 4
Make sure nothing is selected.
Click Run.
This can take a few minutes.
A new folder within the Selection folder will be created to save the TIFF files. It will not save over the original RAW.
Photoshop can now be closed.
Check in Bridge that your new TIFF folder has all the images you selected, and the process is complete.
License for reuse
These training pages are licensed for reuse under a Creative Commons Attribution-NonCommercial-ShareAlike 4.0 International License.
We are delighted for you to reuse, build on and publish the training content in these pages for non-commercial purposes. When you do, we ask that you credit National Museums Scotland and share the content under the same licensing terms.