Photoshop Elements
The following is one of many ways to manage editing. Everyone has their own way of working so feel free to incorporate some or all these steps to help speed up your workflow.
It is, of course, possible to open one image at a time, edit and save your image. Here we are going to focus on batch editing and automation to edit, rename and export multiple images simultaneously.
Before we begin, open your preferred storage location and create a folder which clearly identifies the project you are working on. Within that folder create a folder called RAW. Copy the images from your memory card or camera to your newly created RAW folder.
Once the files have copied over you may open Adobe Photoshop Elements.
Step 1: Selection
Once Elements is selected a window will appear that gives you three options:
- Photo Editor which is a simplified version of Photoshop
- Organizer which is a platform to view and manage your files
- Video Editor for basic video editing.
To start selecting and renaming your files, select the Organizer button.
Once open, select import > from files and folders and navigate to the folder where your images are saved. Select all your images and click Open.
The first time you use Elements you might have to set up your preferences. We recommend making all the file information visible under the thumbnail. To change your preferences, select the View menu. Make sure Details and Filename are both checked.
Now the file name and stars will be visible under each thumbnail.
If you wish to see your images larger, use the zoom slider in the bottom right- hand corner to increase the size. This will make reviewing your images easier.
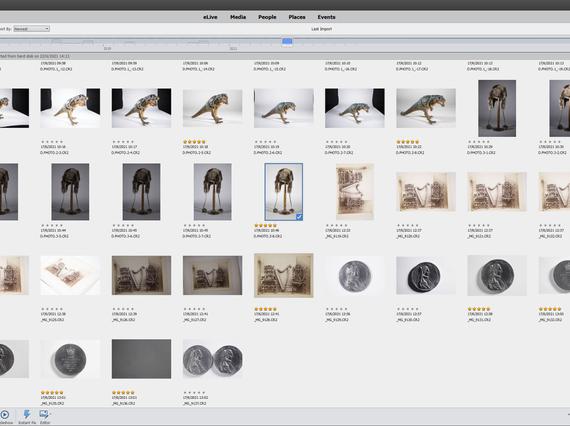
Now that your interface is set up, start by selecting the images you wish to keep. It is good practice to avoid deleting images, but instead limit or filter what is visible. This way, if you change your mind, you can easily go back and edit your selection. To do this use a 5-star rating.
Go through your images one at a time and apply a 5-star rating to images you want to keep, including any images with grey cards, file names and blank separator images as these will help you manage your files later.
Under the image thumbnails there are 5 grey stars. Click on the 5th star to highlight them all. This indicates the file has been rated. Alternatively, you can use keyboard shortcut 5.
If you change your mind and wish to remove the rating, click the 5th star a second time or keyboard shortcut 0.
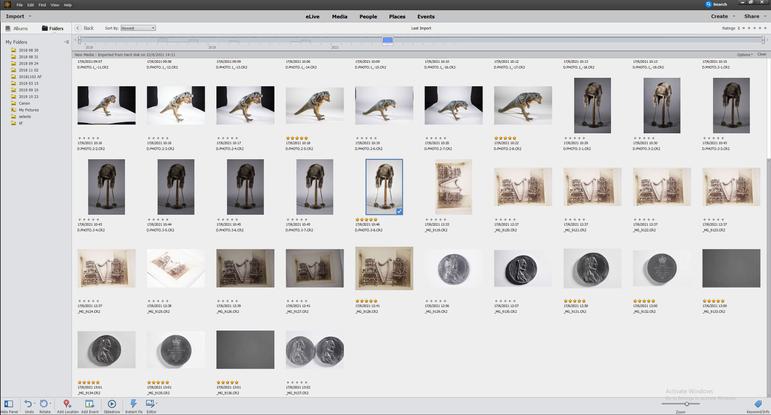
Now that your images have been rated you can use this to apply a filter. This will hide any files that do not have a 5-star rating. In the top right-hand corner of the screen there are 5 greyed-out stars. Make sure this section reads Ratings ≥ (greater than or equal to) or = (equal to) and select the 5th star. If you need to make a change, click on the symbol to reveal the drop-down menu.
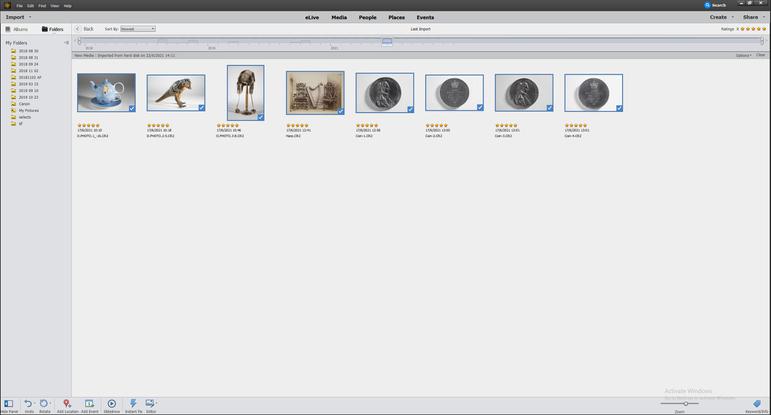
The only files visible to you will now be the ones you have chosen. To bring back the hidden files, click the 5th star at the top right-hand corner of the screen a second time.
Now that you have filtered only the images you want to work with, you can edit them as a batch. Select your images and click the Editor tab in the bottom left tool bar. If you are working with many files do this in batches of 20-30 to avoid overloading your computer. The editor software will open in a second window along with a smaller pop-up window called Camera Raw. This is where you will batch edit your images.
Step 2: Batch editing
Colour balance
Colour balance is important as the colours in your image should represent the real object as accurately as possible.
You can use the image of your grey card to do this. Start by selecting the image containing the grey card or colour checker. With this as your starting image, select all remaining images by right clicking > Select all or with keyboard shortcut Ctrl + A.
Select the White Balance tool. This is the tool which looks like an eye dropper. On older version of Camera Raw this tool appears in the tool bar above the preview image; on newer versions it appears in the panel on the right-hand side. With the eye dropper click on the grey square of the grey card. This is telling the software that this area is neutral grey and to adjust the colour accordingly. This change will apply simulations to all selected images.
Exposure/ Blacks
Next, we are going to look at exposure. Sometimes, especially if using automatic settings, the image may come out over- or under-exposed. To correct your exposure, we are going to use the exposure slider on the right-hand side. You can move the slider right to brighten the image and left to darken the image. You can speed up the process by adjusting the exposure of multiple images at the same time. When batch adjusting exposure, remember that the same adjustment will be applied to all images so make sure the images you select are of a similar exposure.
If the images are positioned together, click the first image, hold shift, and click the last image or, alternatively, if the images are spaced out, hold CTRL, and click the images you want to use. With your selection made, adjust the exposure with the exposure slider.
The black slider will add a little depth into the image but should be used sparingly. For more accuracy click the box above the slider and adjust with the up and down arrow key. This will move the slider one increment at a time, giving you more control. Moving the slider left will add more black tones.This can also be applied to multiple images at once.
Crop
Finally, you are going to crop your images using the crop tool. If you are using an older version, this is located on the tool bar above the preview images. In newer versions it is on the tool bar on the right-hand side.
You can adjust your crop area with the buttons in the corners and all four sides. Click and drag the edges of the square to adjust its size. Click in the centre of the crop area to move the square around. To rotate your crop area, move your mouse cursor outside the grid until you see a curved arrow. Click and drag to rotate your crop.
As with the other tools, the crop tool can be used on multiple images simultaneously. Select images where the object is in the same position within your frame and apply your crop.
Once you are happy with your adjustments, click Done and select the organiser tab from your tool bar.
The changes you have made to your images will now be visible here.
Step 3: Batch renaming
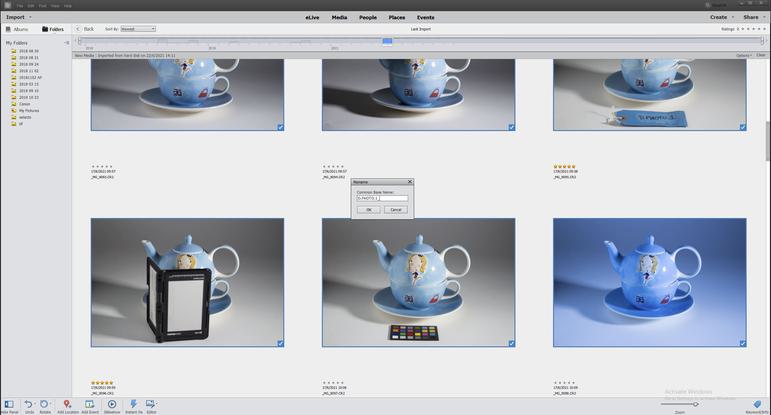
Now that your images have been edited, you are going to rename them. It is good practice to rename your files after the object accession number so they can easily be traced back to their object if the files are misplaced. It also makes searching for images of specific objects much easier.
Select the image or images belonging to an object. Click File> Rename or keyboard shortcut CTRL + SHIFT + N. Type the accession number in the pop-up box followed by OK this will apply the file name to all the images selected. If more than one image is selected a dash and a number will be automatically added to the end.
Repeat this process with the remainder of your images. If you have taken blank spacer images or filename images, this is where they will help you identify which images belong to each object.
Once you have renamed all your files you can remove the images of the grey card, blank spaces, or file names. Remove the star rating by clicking the 5th star or keyboard shortcut 0.
You should now see only your edited, renamed files. Create a new folder named Selection and move all your finished files into that folder. If you were working with jpegs, the process is now complete.
If you are working with Raw files, we need to convert the files into a usable format. TIFF is recommended as it does not compress the file. Jpegs can be made, if needed, at a later date. By using Tiff, you are retaining maximum quality.
Step 4: Batch save as TIFF
Select all your images.
Select File > Export New File(s).
A window will pop up. Fill in the following fields:
File Type: TIFF
Size and Quality: Original
Location: Navigate to your Project folder and create a new folder named Output. Select this folder.
Filenames: Original Names
Click Export. The process is now complete.
License for reuse
These training pages are licensed for reuse under a Creative Commons Attribution-NonCommercial-ShareAlike 4.0 International License.
We are delighted for you to reuse, build on and publish the training content in these pages for non-commercial purposes. When you do, we ask that you credit National Museums Scotland and share the content under the same licensing terms.